
Golf Setup Fundamentals for Beginners
A repeatable beginner golf setup starts with a clubface aimed along the intended target line, a secure but relaxed grip, a balanced stance with ball position suited to the club, and a comfortable hip hinge that lets the arms hang naturally. For a neutral starting position, the feet, hips and shoulders are broadly parallel to the target line; setup provides a consistent address, not a guarantee of ball flight.
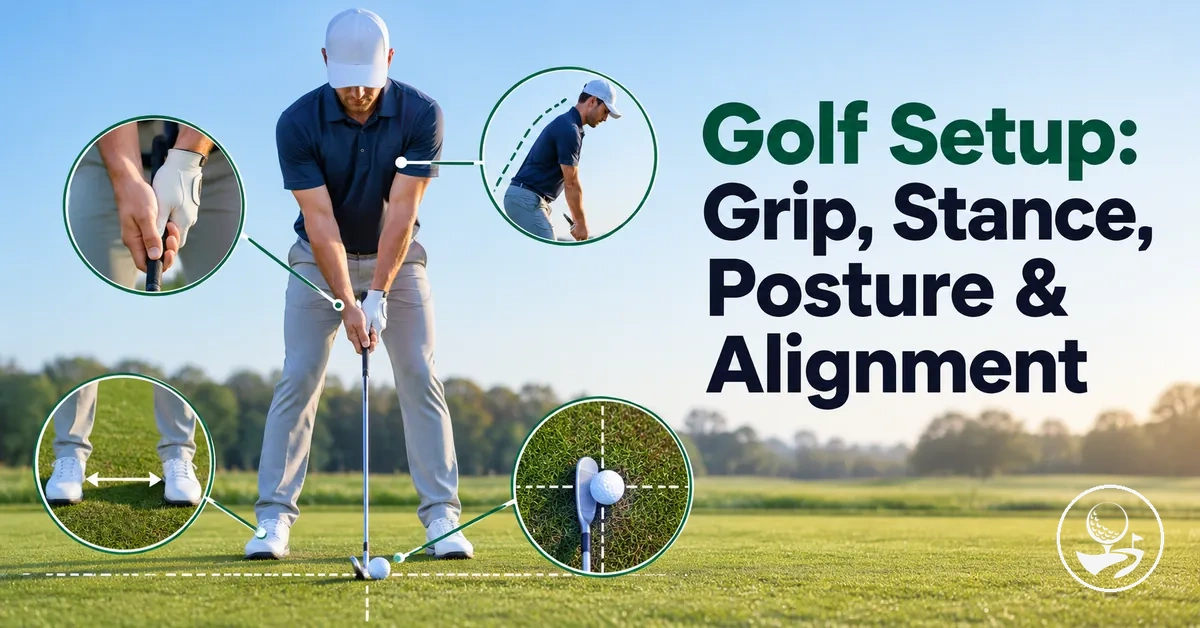
THE PRE-SWING REFERENCE
Build a repeatable golf address
Use these four checks in order, then select your club for a starting ball-position cue.
- Target & clubfaceChoose a target line. For a neutral setup, aim the clubface square to it.
- Hands & gripConnect both hands securely around the handle without rigid grip pressure.
- Stance & ballUse a stable, mobile base. Position the ball for the club you are using.
- Posture & alignmentHinge at the hips, let the arms hang and check balanced feet and broadly parallel body lines.
These are relative starting cues, not fixed measurements. Club choice, shot intention and body proportions can change the details; impact conditions also affect the resulting shot.
Work through the sections below to refine each address relationship, then use the final pre-swing routine to check them together.
Table of Contents
Grip: Hand Placement and Pressure
A golf grip is the golfer’s hand-to-club connection at address, with hand placement and grip pressure acting as separate but related attributes.
The lead hand is the hand nearer the target (left for a right-handed golfer, right for a left-handed golfer); the trail hand is the other hand. Hand placement determines how both hands fit around the club handle, while grip pressure describes how firmly that connection is held.
Hand orientation can influence clubface control, but grip alone does not determine shot shape.
For a workable beginner grip, the lead hand establishes the first connection to the handle and the trail hand fits against it without forcing either hand into an exaggerated rotation.
Grip pressure should keep the club secure without creating unnecessary tension in the hands and forearms.
The image identifies the lead hand, trail hand and club handle so their relationship and hand orientation are easier to recognise at address.
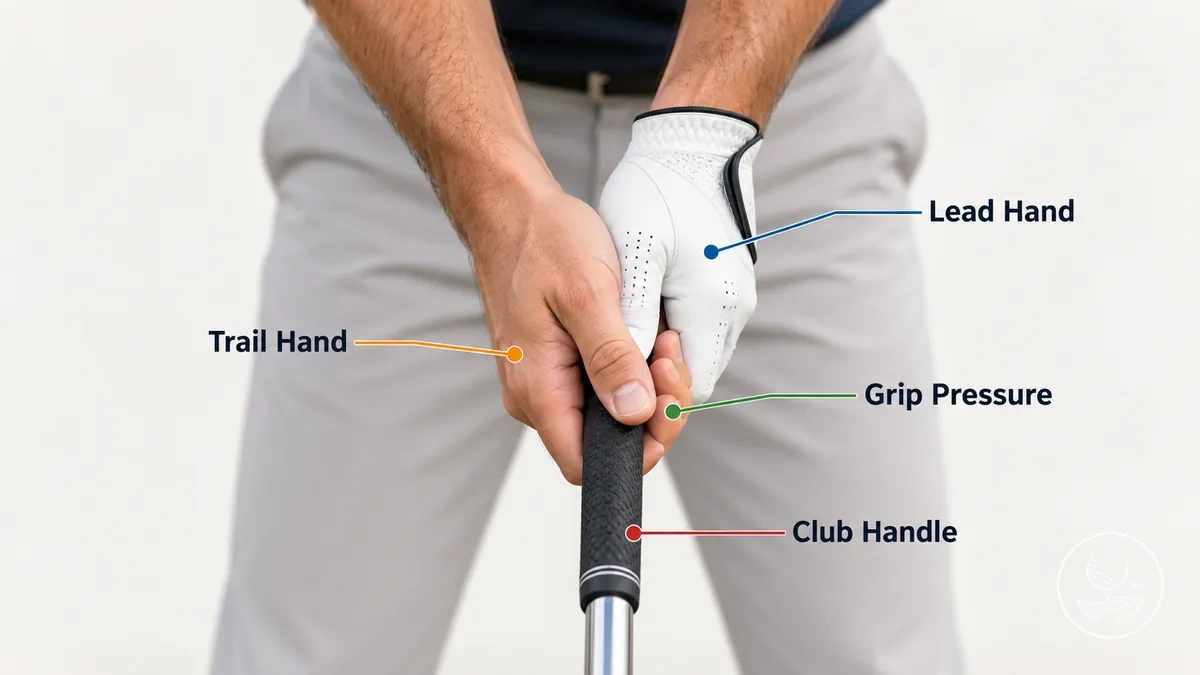
- Lead-hand placement: position the lead hand so it wraps securely around the club handle and supports a stable hand-to-handle connection.
- Trail-hand fit: fit the trail hand closely with the lead hand so both hands function as one connected grip rather than two separate holds.
- Grip pressure: hold the club securely while keeping the hands and forearms free from excessive tension.
- Neutral orientation: use a hand orientation that is not markedly rotated around the handle in either direction; its exact appearance can vary with hand size, mobility and preferred grip style.
- Neutral baseline: both hands fit together securely on the handle with controlled pressure and no clearly exaggerated rotation.
- Clearly over-rotated hands: marked rotation around the handle changes the hands’ relationship to the clubface and can influence face control, but does not by itself determine ball flight.
- Excessive grip tension: a grip that makes the hands or forearms feel rigid moves away from a relaxed, repeatable pressure state.
The visible form of a neutral grip can differ with hand size, mobility and grip style. Overlapping, interlocking and ten-finger grips are common options; the useful test is whether the hands connect comfortably and hold the club securely without excessive tension.
A useful beginner checkpoint is therefore a repeatable grip in which both hands fit securely, pressure remains controlled rather than rigid, and hand orientation is not obviously exaggerated.
Stance, Ball Position and Balance
Stance, ball position and balance form one connected base at address: foot spacing and foot orientation organize the feet, ball position locates the ball relative to that base, and balance keeps pressure controlled before movement begins.
In a neutral mid-iron setup, a useful starting point is a stable stance around shoulder width, with the ball near the centre to slightly forward of centre and pressure balanced through the feet rather than pushed towards an extreme. Foot spacing remains adjustable for body proportions and comfortable movement.
The image shows how the feet, ball and balanced body position relate within that mid-iron reference.
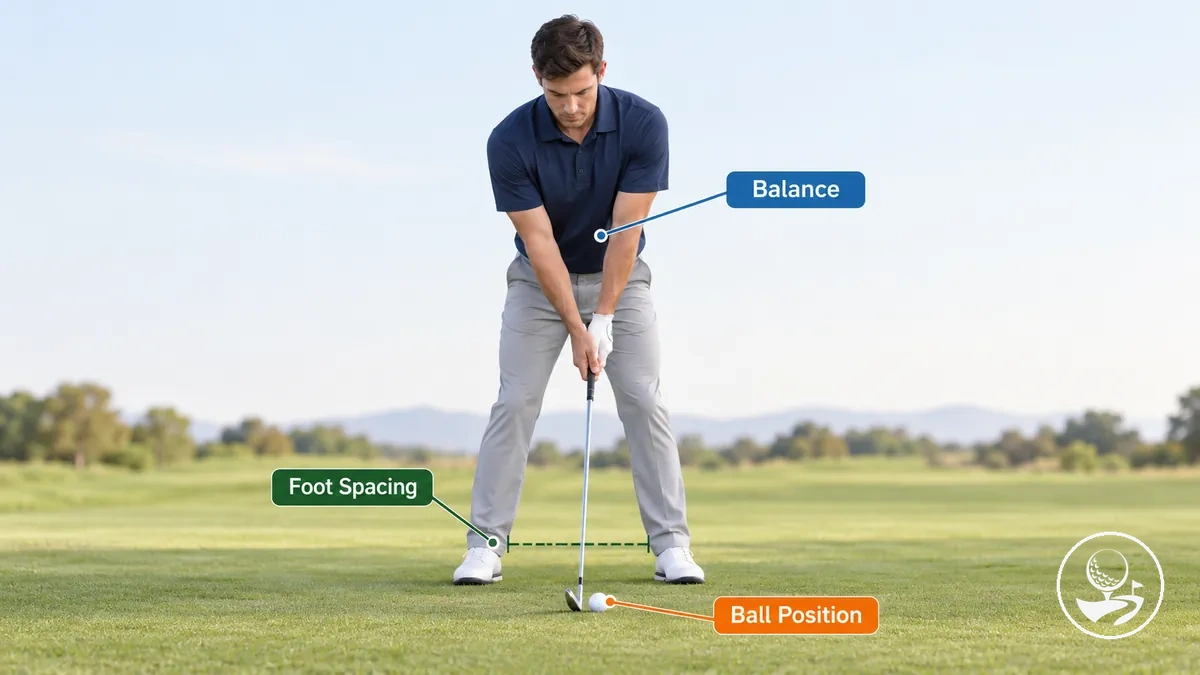
- Stance and feet: use foot spacing and foot orientation that provide a stable address while leaving the body comfortable enough to move.
- Ball position: locate the ball relative to the feet and stance; the exact position may change with club length and shot intention.
- Balance and pressure: begin from a controlled, balanced pressure state rather than placing excessive pressure toward one foot or one edge of the feet.
The neutral mid-iron example is a baseline rather than a universal position for every club.
As club length or shot intention changes, stance width and ball position may also change while the golfer still needs a stable base and controlled balance at address.
These variations are better judged by the specific club and shot than by a fixed width or weight percentage.
The narrower stance-width and club-specific ball-position details can then be considered without changing the basic relationship among the feet, ball and balance.
Stance Width and Weight Distribution
A workable beginner stance width uses foot spacing that feels stable at address while leaving enough freedom to move. A stance around shoulder width for a mid-iron is one starting cue, not a fixed requirement; pressure should feel supported through both feet rather than deliberately loaded to one side.
Width is best compared relatively rather than by one universal measurement, so the image shows narrow, neutral and wide stance conditions using the same golfer and ball reference.
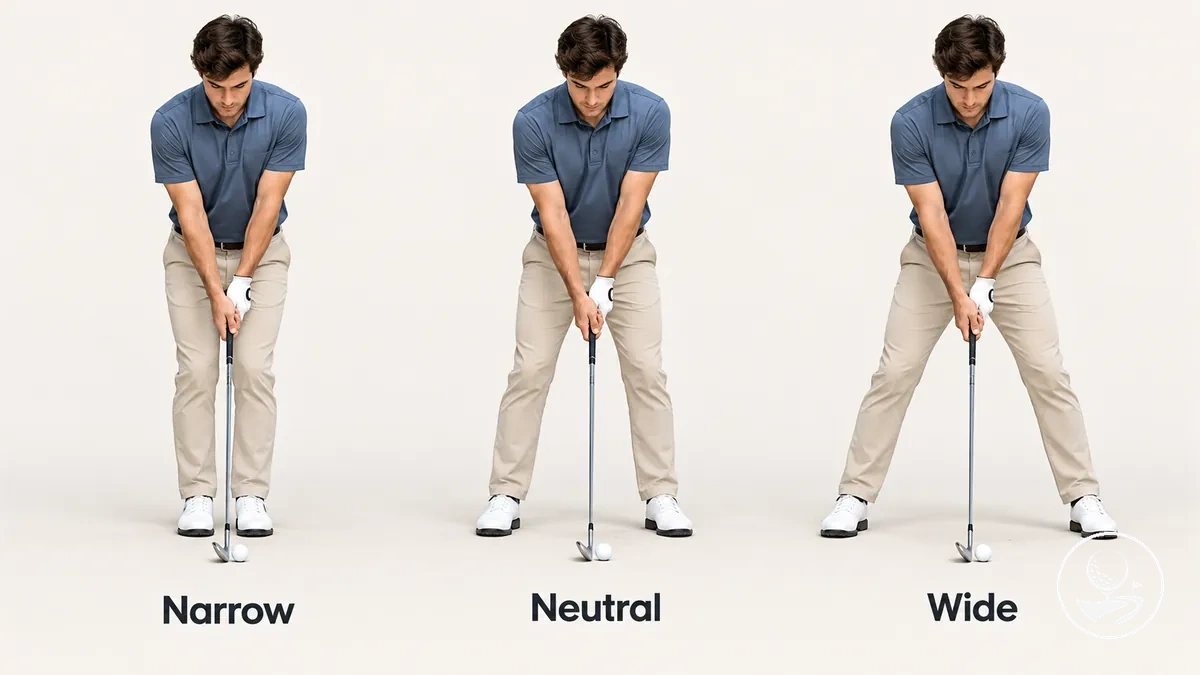
- Narrower than useful: foot spacing that feels cramped or unstable can reduce the size of the base and make balance harder to maintain.
- Neutral/balanced baseline: use enough stance width to feel stable through both feet while remaining comfortable rather than rigid.
- Wider than useful: extra width creates a broader base but may restrict comfortable movement when it exceeds what the club length or shot intention requires.
Stance width can vary with club length and shot intention, so a modestly narrower or wider setup can still be appropriate when stability and balance are preserved.
Static address pressure should remain a feel-based balance cue rather than a fixed percentage rule.
The relevant comparison is whether the feet support a controlled address without the golfer feeling unstable, braced or trapped by the stance.
A practical check is to stand over the ball with balanced pressure through both feet and confirm that the position feels stable without unnecessary rigidity.
Ball Position as Club Length Changes
Ball position is measured relative to the stance and commonly shifts as club length and shot requirements change, so one fixed position does not suit every club or instructional model.
A conservative beginner pattern moves from shorter clubs nearer the centre of stance toward longer clubs farther forward, with the driver toward the lead side.
The image shows that relative progression without assigning exact distances or treating any single position as universal.
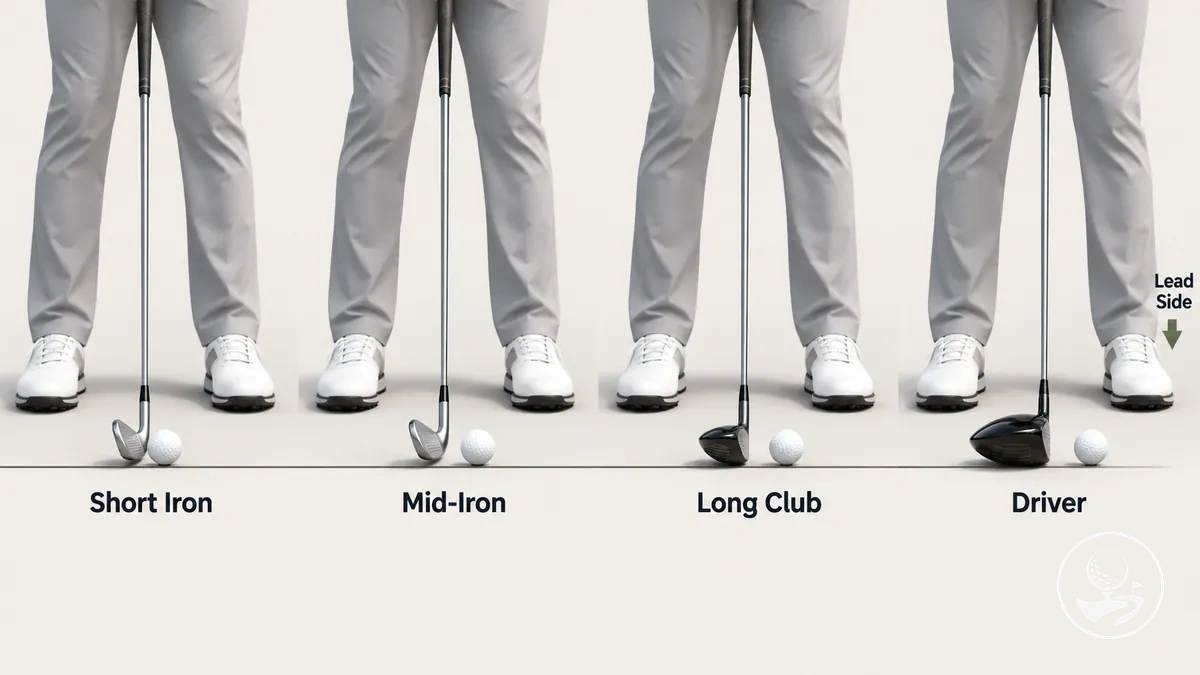
Teaching methods vary, so these positions are a conservative beginner reference rather than a universal standard.
| Club category | Typical beginner ball-position zone | Setup implication |
|---|---|---|
| Short iron | Near the centre of stance | A central reference suits the shorter club; moving the ball farther back places it closer to the trail side of the stance. |
| Mid-iron | Centre to slightly forward of centre | The ball may sit modestly farther forward as club length increases while remaining inside the stance. |
| Long club | Forward of the mid-iron position | Longer clubs commonly use a more forward ball position, although the amount depends on the club and intended shot. |
| Driver | Farther forward, toward the lead heel | This represents the forward end of the progression for a teed driver shot rather than a universal lead-heel rule. |
Moving ball position forward shifts the ball towards the lead foot (left for right-handed golfers, right for left-handed golfers); moving it back shifts the reference towards the trail foot. For a teed driver shot, a common starting zone is towards the inside of the lead heel, rather than the central iron position.
A position that is excessively forward or back for the chosen club can alter the golfer’s address relationships, but ball position alone does not confirm a particular impact result.
The useful reference is the relative progression across club length rather than an exact universal measurement.
Exact placement can still change with technique and shot type.
Posture and Distance from the Ball
Posture and distance from the ball form linked address geometry: the golfer’s body position and the club together influence where the golfer stands relative to the ball.
A comfortable hip hinge and soft knee flex position the body so the arms can hang naturally rather than being forced toward or away from the club.
The side-view image shows how hip hinge, arm hang, the club and ball combine to create practical standing distance at address.
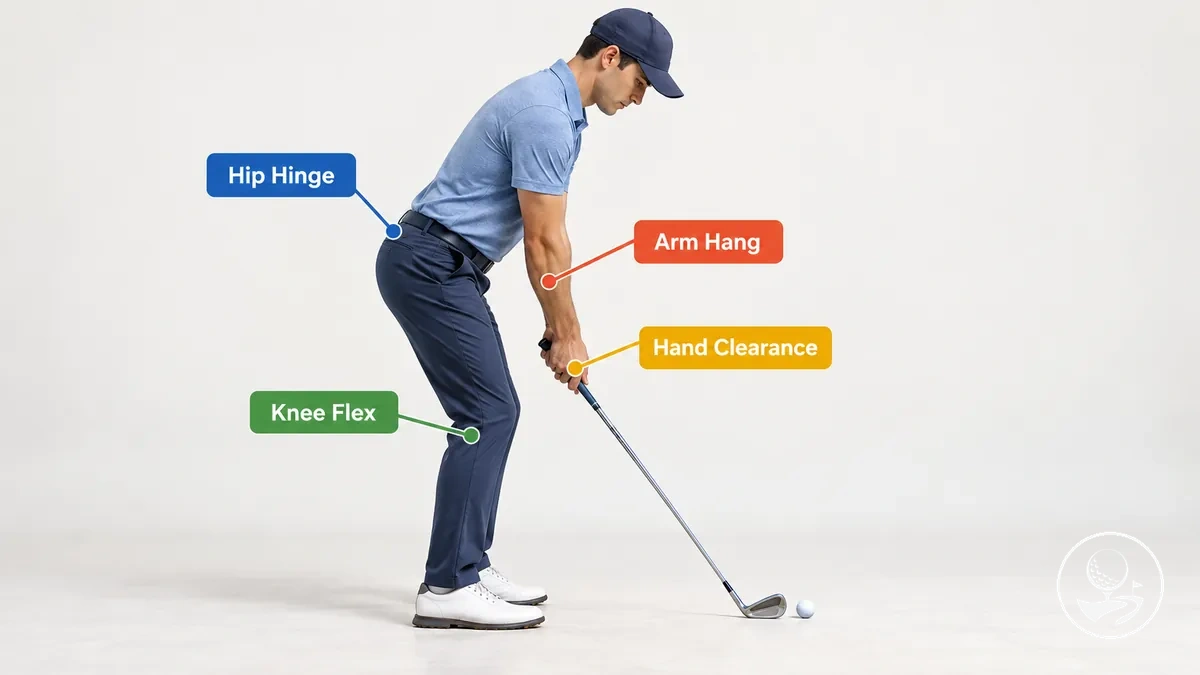
Natural arm hang helps provide hand clearance between the hands and body, while club length influences where the clubhead reaches the ground and therefore the usable distance from the ball.
The posture should also allow the golfer to maintain balance without forcing the knees into a deep bend or stretching the arms toward the ball.
Because body proportions and club dimensions vary, the useful reference is a functional middle range rather than a fixed angle or distance.
- Cramped: standing too close can reduce hand clearance and leave the arms crowded against the body.
- Functional middle range: the hip hinge, knee flex and natural arm hang allow comfortable hand clearance while the golfer remains balanced over the feet.
- Overreaching: standing too far away can pull the arms away from their natural hang and make the address position feel stretched.
Body proportions and club length can shift the exact standing distance while the same relationship remains: posture should allow the arms to hang naturally, the hands to have usable space and the golfer to stay balanced.
A practical beginner reference is the middle range between feeling crowded and feeling stretched, rather than one universal measurement.
Posture Checkpoints at Address
Posture checkpoints at address can be verified through a small set of observable conditions for balance, body position and arm freedom rather than exact body angles.
The posture check covers balance, knee flex, hip hinge, spine position, chin clearance and arm hang without forcing every golfer into identical body angles.
- Balanced feet
- confirm that pressure feels supported through both feet without obvious tipping toward the toes, heels or one side; this supports balance at address.
- Soft knees
- keep enough knee flex to remain comfortable and mobile without sitting excessively low or locking the legs straight.
- Hip hinge
- hinge from the hips so the torso inclines toward the ball while the body remains balanced, rather than standing excessively upright.
- Spine position
- use a comfortable spine position that follows the hip hinge without forcing an exact angle or exaggerated curve.
- Chin clearance
- allow enough space beneath the chin for the neck and upper body to feel unrestricted rather than compressed into the chest.
- Arm hang
- confirm that the arms hang naturally beneath the upper body instead of reaching toward the ball or being crowded against the torso; relaxed arm hang suggests usable freedom of movement.
Body proportions and mobility can change how these posture conditions look, so their visual shape can vary between golfers.
These checkpoints evaluate posture at address only and do not determine whether the same relationships are maintained during the swing.
A practical pass is an address position that feels comfortable and balanced with relaxed arm hang; feeling seated too low, excessively upright or forced to reach suggests that the posture needs adjustment.
How Far to Stand from the Ball
There is no single fixed distance from the ball; useful spacing depends on posture, natural arm hang, hand-to-body clearance and the club length being used.
A workable standing distance allows the golfer to stay balanced while the arms hang comfortably and the club reaches the ball without forced reaching or crowding.
Too close
limited hand-to-body clearance can make the address feel cramped and can push the arms or posture away from a natural position. A repeated contact-location pattern may suggest that setup distance is worth checking, but it does not prove that standing too close is the cause.
Functional spacing
natural arm hang, comfortable hand-to-body clearance and balanced posture allow the club to sit at the ball without the golfer feeling cramped or stretched. Contact location can be observed as a clue, but it is not confirmation that the distance from the ball is correct or incorrect.
Too far
excessive distance from the ball can make the golfer feel stretched and encourage the arms to reach away from their natural hang. A repeated contact-location pattern may suggest checking standing distance, but it does not prove that excessive reach caused the pattern.
Club length changes the standing-distance requirement, so a driver and an iron do not need to place the golfer at exactly the same distance from the ball.
The longer driver changes how the club reaches the ball, while the same criteria of arm hang, hand clearance, posture and balance remain useful.
Contact location should therefore remain a diagnostic clue rather than proof of a specific setup cause.
A practical self-check is whether the golfer can address the ball with balanced posture, relaxed arm hang and comfortable hand-to-body clearance without feeling cramped or stretched.
If those conditions are present, the spacing is functionally appropriate for that club without requiring a fixed measurement.
Alignment: Clubface and Body Lines
Golf alignment is the relationship among the clubface, target line and body lines at address.
Check the clubface and body lines separately so a problem with aim is not confused with the body’s starting direction.
- Clubface aim
- the clubface is oriented toward the intended target line at address, establishing the primary aim reference for the club.
- Body-line alignment
- the feet, hips and shoulders form body lines that can run approximately parallel to the target line in a neutral setup instead of aiming directly at the same point as the clubface.
The parallel-lines model is a simple spatial reference for a neutral setup, not an absolute rule for every shot.
Exact body alignment can vary with shot intention and individual setup, while the distinction between clubface aim and body-line direction remains useful.
Alignment at address provides a reference for aim, but it does not guarantee a particular ball flight.
Clubface Aim and the Target Line
The target line is the directional line from the ball toward the intended target, and clubface aim describes how the clubface is set relative to that line at address.
For a neutral straight-shot reference, the clubface is set square to the target line before the body is arranged around that aim.
A square-looking clubface at setup establishes an address reference, not a guaranteed ball-flight result.
An intermediate target can be used as a nearer aim reference when it helps the golfer relate the clubface to the intended target line.
- Intended target: choose the specific target that defines the target line from the ball.
- Intermediate target: when useful, select a nearer reference on the same target line to make the aim direction easier to judge.
- Clubface orientation: set the clubface square to the chosen target line for a neutral baseline rather than aiming it independently of that reference.
- Verification: confirm at address that the clubface still relates to the intended target line before completing the rest of the setup.
For a simple straight-shot setup, the golfer can choose an intended target, use an intermediate target if helpful and set the clubface square to that line before arranging the body.
Address aim does not by itself determine ball flight because impact conditions and swing path also matter.
A slice or another shot shape therefore cannot be diagnosed from clubface aim at address alone.
Feet, Hips and Shoulders Relative to the Target Line
After the clubface is aimed, the feet, hips and shoulders can be checked as separate body lines relative to the target line at address.
For a neutral beginner baseline, these body lines run approximately parallel to the target line rather than pointing at the same distant spot.
- Feet
- check the line formed across the feet; in a neutral setup it should run generally parallel to the target line rather than clearly angling across or away from it.
- Hips
- compare the direction across the hips with the feet and target line; a neutral address keeps the hips broadly consistent with the same parallel alignment pattern without forcing an exact angle.
- Shoulders
- use the shoulder line, including the lead shoulder, as a separate recognition cue; it should relate consistently to the target line rather than appearing obviously misaligned with the feet.
Small deviations in body alignment can occur because of anatomy, stance shape or an intentional shot choice, so the three lines do not need to appear identical.
An obvious misalignment is different: for example, feet or shoulders that unknowingly point away from the intended line change the starting orientation at address.
One body line alone does not determine later ball flight.
The useful check is whether the feet, hips and shoulders are directionally organized around the same target-line reference.
A Repeatable Golf Setup Sequence
A repeatable golf setup sequence is a consistent order for checking the same address conditions before motion begins.
The routine organizes the target, clubface, grip, stance, ball position, posture, distance, body alignment and balance so each setup can be verified in the same way.
Use the following sequence as a practical baseline; the exact micro-order may vary as long as the same address conditions are verified consistently.
- Select the target: choose the intended target and confirm the target line before arranging the rest of the setup.
- Set the clubface: aim the clubface relative to the target line and verify that the face still matches the intended aim reference.
- Take the grip: place both hands on the club with secure, controlled pressure and check that the grip feels connected rather than tense.
- Establish stance and ball position: set the feet and locate the ball for the club being used, then confirm that the stance feels stable rather than cramped or excessively wide.
- Build posture and distance: use a comfortable hip hinge and natural arm hang, then check that the distance from the ball provides usable hand clearance without reaching.
- Verify body alignment and balance: check the feet, hips and shoulders relative to the target line while confirming that balance remains controlled through the feet.
- Complete the final check: confirm that the grip, clubface, ball position, posture, body alignment, balance and target relationship are internally consistent before starting the swing.
A ready-to-swing setup is one in which the hands, club, ball, body and target relationships have all been checked without beginning the takeaway.
Golfers can adjust the exact micro-order to suit their routine as long as the same critical conditions are verified consistently.
Once address verification is complete, swing mechanics begin as a separate phase rather than another setup step.
Setup Faults to Catch Before the Swing
A setup fault is an observable or feel-based address error that can be checked before movement begins.
These checks isolate starting conditions such as grip tension, stance width, ball position, posture, distance from the ball, clubface aim and alignment; they do not prove the cause of a later contact or ball-flight result.
Excessive grip tension
- Recognise
- a recognition cue is rigid hands or forearms at address
- Check and adjust
- this can restrict a comfortable setup connection, so reduce pressure until the club remains secure without unnecessary tension.
Unstable stance width
- Recognise
- feeling cramped in a very narrow base or braced in an excessively wide one may reduce balance and comfortable movement
- Check and adjust
- correct the stance width until the feet provide a stable but non-rigid base.
Misplaced ball position
- Recognise
- a ball that sits noticeably outside the intended position for the club can alter the starting relationship between the body and club
- Check and adjust
- check its location relative to the stance and reset it for the club being used.
Cramped or reaching posture
- Recognise
- limited hand clearance or arms stretched away from their natural hang can indicate an unsuitable distance from the ball
- Check and adjust
- correct the standing distance until the arms hang comfortably and balance is maintained.
Misaligned clubface
- Recognise
- a clubface that visibly aims away from the intended target line changes the address aim condition
- Check and adjust
- reset the clubface relative to the chosen target line before arranging the rest of the setup.
Misaligned body lines
- Recognise
- feet, hips or shoulders that unintentionally point away from the intended alignment reference can change the starting orientation
- Check and adjust
- check the body lines against the target line and restore the intended address alignment.
These setup mistakes may contribute to an inconsistent starting condition, but an address fault alone does not establish the cause of a slice, topped shot or inconsistent contact. Impact and swing mechanics can also influence those outcomes.
If contact problems persist after the visible setup checks, review swing motion and impact separately rather than continuing to assume a setup cause. Use the same pre-swing routine on repeat attempts so that address conditions remain comparable.